Static Site Generators on the IC
Apr 05, 2021
Update - video recording!
I delivered a talk for our Genesis event, walking through the process of this blog post. That video recording is now available here:
Intro
Following up on my recent post announcing http-powered canisters, I want to walk through what it takes to build a frontend application on the Internet Computer whil taking advantage of the new features we support. If it seems simple, that's great! We worked to make this workflow approachable to engineers who are already used to hosting static assets on Netlify, Fastly, or S3 buckets.
For the sake of this demo, I'll be using Gatsby.js, the framework I use to maintain this blog.
Getting Started
To begin, I run the command
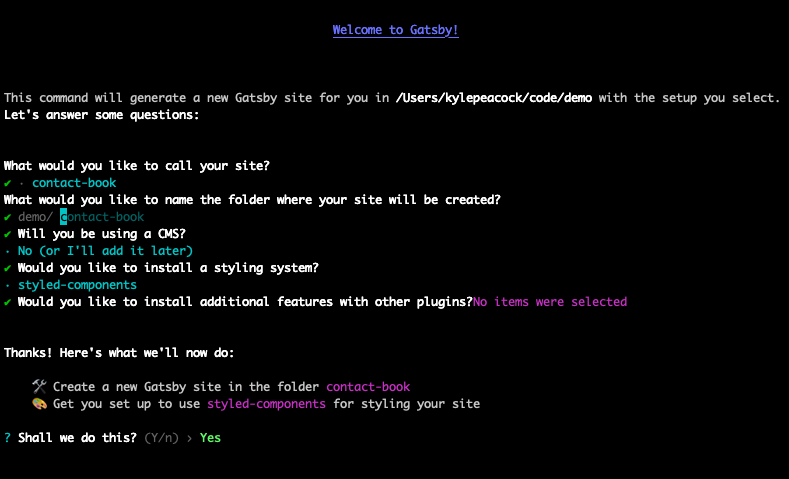
The Gatsby new project CLI
This will set me up with a simple file structure:
├── README.md
├── gatsby-config.js
├── package-lock.json
├── package.json
└── src
    ├── images
    │   └── icon.png
    └── pages
        ├── 404.js
        └── index.js
Deploy a static site
We can start the project up with
In order to host the project on the Internet computer, we will need to do the following:
- create and configure a
dfx.json file at the root of the project - install the
dfx SDK - deploy using the
dfx deploy command
Creating dfx.json
Because Gatsby compiles its build output into the
// dfx.json
{
  "canisters": {
    "www": {
      "type": "assets",
      "source": ["public"]
    }
  }
}
Installing dfx
Going forward, you'll be able to follow the documentation at sdk.dfinity.org, but if you are reading this soon after it's published, you'll need to run this command to install the latest preview build of
DFX_VERSION=0.7.0-beta.2 sh -ci "$(curl -fsSL https://sdk.dfinity.org/install.sh)"
You'll be prompted to agree to install that version, and you should be good to go!
Deploy your site
Start by running
Once your site deploy is finished, you can find your canister id by running
Update - how to fund your first canister
We now have a guide on how to pay for and set up your first canister. The basic flow (for now) basically looks like:
- Register your identity with the ledger canister
- Use the ledger to create an empty canister
- Install a cycles wallet to that canister
- Set that wallet as your wallet.
Take a breather
Congratulations! You've deployed your first Internet Computer web application! There's a very good chance that this is your first application built on blockchain technology at all, and that's worth celebrating. You'll see that all your assets from HTML to images are all behaving normally, as if you had pulled them directly from an old-school Nginx or PHP static server.
Customizing the application
Now, let's customize the code here a bit. I want to build a contact book, so let's swap out the logic in
The code's a bit long, so to reveal
// index.js
import * as React from "react";
import styled from "styled-components";
import vCard from "vcf";

// styles
const Main = styled.main`
  color: "#232129";
  padding: 96;
  font-family: "-apple-system, Roboto, sans-serif, serif";
  width: fit-content;

  fieldset,
  label {
    display: flex;
    flex-direction: column;
  }
  input {
    min-width: 280px;
    width: fit-content;
  }
`;

const ProfilePicture = styled.picture`
  display: flex;
  width: 256px;
  img {
    width: 100%;
  }
`;

const DataList = styled.dl`
  display: grid;
  grid-template-columns: auto auto;
  dt,
  dd {
    /* width: fit-content; */
    display: inline-flex;
    border: 1px solid black;
    padding: 4px;
    margin: 0;
    padding-right: 16px;
  }
  picture,
  image {
    max-width: 75px;
  }
`;

const ContactCard = ({ card }) => {
  if (!card || !card.data) return null;
  return (
    <section>
      <DataList>
        {Object.entries(card.data).map(([key, value]) => {
          const [_field, _data] = value;
          console.log(value);
          if (value._field === "photo") {
            return (
              <React.Fragment key={value._field}>
                <dt>{value._field}</dt>
                <dd>
                  <ProfilePicture>
                    <img
                      style={{ maxWidth: "75px" }}
                      src={atob(value._data)}
                      alt="profile"
                    />
                  </ProfilePicture>
                </dd>
              </React.Fragment>
            );
          } else {
            return (
              <>
                <dt>{value._field}</dt>
                <dd>{value._data}</dd>
              </>
            );
          }
        })}
      </DataList>
      <a
        href={`data:text/plain;charset=utf-8,${encodeURIComponent(
          card.toString()
        )}`}
        download="contact.vcf"
      >
        Download VCF
      </a>
    </section>
  );
};

// markup
const IndexPage = () => {
  const [image, setImage] = React.useState("");
  const [card, setCard] = React.useState(null);
  const [actor, setActor] = React.useState(null);

  function handleSubmit(e) {
    e.preventDefault();

    const card = new vCard();
    const inputs = e.target.querySelectorAll("input");
    const email = e.target.querySelector('input[name="email"]').value;
    inputs.forEach(input => {
      if (input.name === "photo") return;
      else if (input.name === "n") {
        // Take full input and format for vcf
        const names = input.value.split(" ");
        const arr = new Array(5);

        names.reverse().forEach((name, idx) => {
          arr[idx] = name;
        });

        card.add("fn", input.value);
        card.add(input.name, arr.join(";"));
      } else {
        card.add(input.name, input.value);
      }
    });
    card.add("photo", btoa(image), { mediatype: "image/gif" });

    return false;
  }

  function handleUpload(e) {
    const file = e.target.files[0];
    const reader = new FileReader();

    reader.addEventListener(
      "load",
      function() {
        // convert image file to base64 string
        setImage(reader.result);
      },
      false
    );

    if (file) {
      reader.readAsDataURL(file);
    }
  }

  function getCard(e) {
    e.preventDefault();
    const email = e.target.querySelector('input[name="emailsearch"]').value;
    return false;
  }

  return (
    <Main>
      <title>Contact Book</title>
      <h1>Internet Computer Address Book</h1>
      <section>
        <h2>Look up a contact by email</h2>
        <form onSubmit={getCard}>
          <label htmlFor="emailsearch">
            <input type="email" name="emailsearch" id="emailsearch" />
          </label>
          <button type="submit">Search</button>
        </form>
      </section>
      {/* Card Display */}
      <ContactCard card={card} />

      <form onSubmit={handleSubmit}>
        <h2>Add a Contact</h2>
        <fieldset>
          <h3>Personal Information</h3>
          <label htmlFor="n">
            Full Name
            <input type="text" name="n" autoComplete="name" />
          </label>
          <label htmlFor="org">
            Organziation
            <input type="text" name="org" autoComplete="organization" />
          </label>
          <label htmlFor="title">
            Title
            <input type="text" name="title" autoComplete="organization-title" />
          </label>
        </fieldset>
        <fieldset>
          <h3>Profile photo</h3>
          <label htmlFor="photo">
            Upload an image
            <input
              type="file"
              id="img"
              name="photo"
              accept="image/*"
              onChange={handleUpload}
            />
          </label>
          {image ? (
            <ProfilePicture>
              <img src={image} alt="user-uploaded profile image" />
            </ProfilePicture>
          ) : null}
        </fieldset>
        <fieldset>
          <h3>Contact</h3>
          <label htmlFor="tel">
            Phone number
            <input type="text" name="tel" />
          </label>
          <label htmlFor="adr">
            Address
            <input type="text" name="adr" autoComplete="on" />
          </label>
          <label htmlFor="email">
            Email
            <input required type="email" name="email" autoComplete="email" />
          </label>
        </fieldset>
        <button type="submit">Submit Contact</button>
      </form>
    </Main>
  );
};

export default IndexPage;
Basically, we have a form that can allow a user to create a contact, an input to search for contacts by email address, and a component to render a saved contact.
There are any number of ways that we could persist this information - I might initially start by writing the data to
Adding a backend
We'll need to make a few changes to modify our project to add a backend canister.
- Add the source code for our contract
- Configure
dfx.json for the backend canister - Configure Gatsby to alias our code generated by
dfx - Use the
@dfinity/agent npm package to make calls to the backend with an Actor - Connect the Actor to our application logic
Adding our backend logic
I'll create a Motoko canister that will implement the simple logic of setting and getting information, stored in a HashMap.
// Main.mo
import HM "mo:base/HashMap";
import Text "mo:base/Text";
import Error "mo:base/Error";
import Iter "mo:base/Iter";


actor {
  stable var entries : [(Text, Text)] = [];

  let store: HM.HashMap<Text, Text> = HM.fromIter(entries.vals(), 16, Text.equal, Text.hash);

  /// returns null if there was no previous value, else returns previous value
  public shared func set(k:Text,v:Text): async ?Text {
    if(k == ""){
      throw Error.reject("Empty string is not a valid key");
    };
    return store.replace(k, v);
  };

  public query func get(k:Text): async ?Text {
    return store.get(k);
  };

  system func preupgrade() {
    entries := Iter.toArray(store.entries());
  };

  system func postupgrade() {
    entries := [];
  };

};
Without diving too far into the details here, this code uses a
We then implement our
I'll save this to a new folder in my
Configure dfx.json
Now, we need to configure
// dfx.json
{
  "canisters": {
    "contact_book": {
      "main": "src/backend/contact_book/Main.mo"
    },
    "www": {
      "dependencies": ["contact_book"],
      "type": "assets",
      "source": ["public"]
    }
  }
}
Configure Gatsby
Next, we'll need to update Gatsby with an alias that points to dynamically generated code from
// gatsby-node.js
const dfxJson = require("./dfx.json");
const webpack = require("webpack");
const path = require("path");

const aliases = Object.entries(dfxJson.canisters).reduce(
  (acc, [name, _value]) => {
    // Get the network name, or `local` by default.
    const networkName = process.env["DFX_NETWORK"] || "local";
    const outputRoot = path.join(
      __dirname,
      ".dfx",
      networkName,
      "canisters",
      name
    );

    return {
      ...acc,
      ["dfx-generated/" + name]: path.join(outputRoot, name + ".js"),
    };
  },
  {}
);

exports.onCreateWebpackConfig = ({ stage, actions }) => {
  actions.setWebpackConfig({
    resolve: {
      alias: aliases,
    },
    plugins: [
      new webpack.ProvidePlugin({
        Buffer: [require.resolve("buffer/"), "Buffer"],
      }),
    ],
  });
};
Note - there is a portion of
Additionally, we'll add a proxy to
// gatsby-config.js
module.exports = {
  siteMetadata: {
    title: "contact book",
  },
  plugins: ["gatsby-plugin-styled-components"],
  proxy: {
    prefix: "/api",
    url: "http://localhost:8000",
  },
};
Using @dfinity/agent
Now that we've aliased our
// actor.js
import { Actor, HttpAgent } from "@dfinity/agent";
import {
  idlFactory,
  canisterId,
} from "dfx-generated/contact_book";

const agent = new HttpAgent();
const actor = Actor.createActor(idlFactory, { agent, canisterId });

export default actor;
Here we create an an agent and pass it to an Actor constructor, along with the
Then, we export our actor, which has two methods,
Finally, we wire it up.
We'll modify our
I'll import the actor (doing this as a dynamic import to avoid initializing the HttpAgent during server-side rendering for Gatsby)
React.useEffect(() => {
  import("../actor").then((module) => {
    setActor(module.default);
  });
}, []);
We'll use our set method during
actor?.set(email, JSON.stringify(card.toJSON())).then(() => {
  alert("card uploaded!");
  inputs.forEach((input) => {
    input.value = "";
  });
  setImage("");
});
and then we will use the
actor?.get(email).then((returnedCard) => {
  if (!returnedCard.length) {
    return alert("No contact found for that email");
  }
  setCard(vCard.fromJSON(returnedCard[0]));
  console.log(returnedCard);
});
And now, we have a fully-functioning application we can run on the Internet Computer!
to reveal the final index.js code
// index.js
import * as React from "react";
import styled from "styled-components";
import vCard from "vcf";

// styles
const Main = styled.main`
  color: "#232129";
  padding: 96;
  font-family: "-apple-system, Roboto, sans-serif, serif";
  width: fit-content;

  fieldset,
  label {
    display: flex;
    flex-direction: column;
  }
  input {
    min-width: 280px;
    width: fit-content;
  }
`;

const ProfilePicture = styled.picture`
  display: flex;
  width: 256px;
  img {
    width: 100%;
  }
`;

const DataList = styled.dl`
  display: grid;
  grid-template-columns: auto auto;
  dt,
  dd {
    /* width: fit-content; */
    display: inline-flex;
    border: 1px solid black;
    padding: 4px;
    margin: 0;
    padding-right: 16px;
  }
  picture,
  image {
    max-width: 75px;
  }
`;

const ContactCard = ({ card }) => {
  if (!card || !card.data) return null;
  return (
    <section>
      <DataList>
        {Object.entries(card.data).map(([key, value]) => {
          const [_field, _data] = value;
          console.log(value);
          if (value._field === "photo") {
            return (
              <React.Fragment key={value._field}>
                <dt>{value._field}</dt>
                <dd>
                  <ProfilePicture>
                    <img
                      style={{ maxWidth: "75px" }}
                      src={atob(value._data)}
                      alt="profile"
                    />
                  </ProfilePicture>
                </dd>
              </React.Fragment>
            );
          } else {
            return (
              <>
                <dt>{value._field}</dt>
                <dd>{value._data}</dd>
              </>
            );
          }
        })}
      </DataList>
      <a
        href={`data:text/plain;charset=utf-8,${encodeURIComponent(
          card.toString()
        )}`}
        download="contact.vcf"
      >
        Download VCF
      </a>
    </section>
  );
};

// markup
const IndexPage = () => {
  const [image, setImage] = React.useState("");
  const [card, setCard] = React.useState(null);
  const [actor, setActor] = React.useState(null);

  function handleSubmit(e) {
    e.preventDefault();

    const card = new vCard();
    const inputs = e.target.querySelectorAll("input");
    const email = e.target.querySelector('input[name="email"]').value;
    inputs.forEach(input => {
      if (input.name === "photo") return;
      else if (input.name === "n") {
        // Take full input and format for vcf
        const names = input.value.split(" ");
        const arr = new Array(5);

        names.reverse().forEach((name, idx) => {
          arr[idx] = name;
        });

        card.add("fn", input.value);
        card.add(input.name, arr.join(";"));
      } else {
        card.add(input.name, input.value);
      }
    });
    card.add("photo", btoa(image), { mediatype: "image/gif" });

    return false;
  }

  function handleUpload(e) {
    const file = e.target.files[0];
    const reader = new FileReader();

    reader.addEventListener(
      "load",
      function() {
        // convert image file to base64 string
        setImage(reader.result);
      },
      false
    );

    if (file) {
      reader.readAsDataURL(file);
    }
  }

  function getCard(e) {
    e.preventDefault();
    const email = e.target.querySelector('input[name="emailsearch"]').value;
    return false;
  }

  return (
    <Main>
      <title>Contact Book</title>
      <h1>Internet Computer Address Book</h1>
      <section>
        <h2>Look up a contact by email</h2>
        <form onSubmit={getCard}>
          <label htmlFor="emailsearch">
            <input type="email" name="emailsearch" id="emailsearch" />
          </label>
          <button type="submit">Search</button>
        </form>
      </section>
      {/* Card Display */}
      <ContactCard card={card} />

      <form onSubmit={handleSubmit}>
        <h2>Add a Contact</h2>
        <fieldset>
          <h3>Personal Information</h3>
          <label htmlFor="n">
            Full Name
            <input type="text" name="n" autoComplete="name" />
          </label>
          <label htmlFor="org">
            Organziation
            <input type="text" name="org" autoComplete="organization" />
          </label>
          <label htmlFor="title">
            Title
            <input type="text" name="title" autoComplete="organization-title" />
          </label>
        </fieldset>
        <fieldset>
          <h3>Profile photo</h3>
          <label htmlFor="photo">
            Upload an image
            <input
              type="file"
              id="img"
              name="photo"
              accept="image/*"
              onChange={handleUpload}
            />
          </label>
          {image ? (
            <ProfilePicture>
              <img src={image} alt="user-uploaded profile image" />
            </ProfilePicture>
          ) : null}
        </fieldset>
        <fieldset>
          <h3>Contact</h3>
          <label htmlFor="tel">
            Phone number
            <input type="text" name="tel" />
          </label>
          <label htmlFor="adr">
            Address
            <input type="text" name="adr" autoComplete="on" />
          </label>
          <label htmlFor="email">
            Email
            <input required type="email" name="email" autoComplete="email" />
          </label>
        </fieldset>
        <button type="submit">Submit Contact</button>
      </form>
    </Main>
  );
};

export default IndexPage;
Wrapping up
Now that we've adapted our codebase, our project structure looks like this:
├── README.md
├── dfx.json
├── gatsby-config.js
├── gatsby-node.js
├── package-lock.json
├── package.json
└── src
    ├── actor.js
    ├── backend
    │   └── contact_book
    │       └── Main.mo
    ├── images
    │   └── icon.png
    └── pages
        ├── 404.js
        └── index.js
We can test the changes locally by running
If all goes well, you should be able to test the application locally by submitting and then retrieving a contact using the UI.
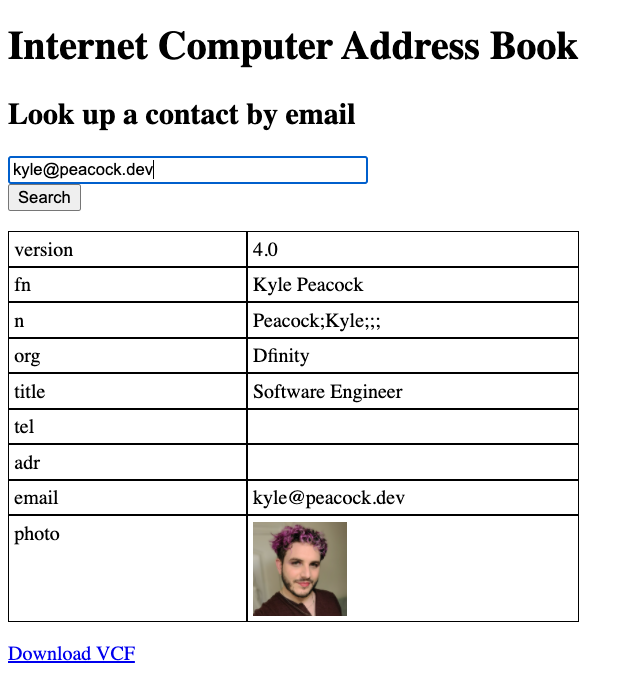
View of successfully retrieving a contact
And that should be it! You can try these steps yourself, download this example project from https://github.com/krpeacock/ic-vcf-gatsby, or use this guide as a reference to get started with your own projects! We can't wait to see what you build!